.

.

.

.

Wednesday, 29 March 2017

Spring || 8x8" Scrapbook Layout || Dovecraft Painted Blooms

Hi all,

Spring is in full swing now, I am obsessed with taking pictures of all the gorgeous flowers in our village. There's something so uplifting about the yellows and purples, even under a cloudy sky.

Here is some inspiration for those of you who are 8x8" scrappers. I loved 8x8" scrapbooking when I first started out, the smaller size is less imposing and you can put together a page in less than half an hour, so it's great if you don't have as much time to craft.


This layout uses the Dovecraft 'Painted Blooms' collection by Trimcraft and you can find step by step instructions on my Trimcraft gallery (link)

(Top tip, little easels are fantastic for photographing smaller layouts and you can pick them up from The Works)

Thanks for stopping by!
Emily xx

Tuesday, 28 March 2017

Spring || Scrapbook Layout || Dovecraft Painted Blooms

Hi all,

I have a layout to share using the Dovecraft Painted Blooms collection from Trimcraft.
When I first saw the floral stamps (before I got my mitts on them) I knew I wanted to make a layout stamping them over coloured watercolour patches....

Here it is!


When I got my hands on the stamps, this project was the first thing I tried but it took three attempts to get right. The first time, I used cardstock that absorbed the water too well and the second time I used too much paint and the result was a brightly coloured Kandinsky-inspired mess.
Fast forward a couple weeks I had another go. Initially I started out using my 'Artiste' watercolour markers I have from my Docrafts days but a few circles in they decided to stop giving out ink. Instead, I bravely got my Reeves watercolour tubes out and squeezed a tiny bit of my chosen colours onto my clear acrylic block. I painted a circle of water and then dropped in a tiny bit of the paint for each circle. The paint spreads out into the wet area but you can help it along with a brush if you like. Once it was all completely dry I added the stamping.

Thanks for stopping by!
Emily xx

Saturday, 25 March 2017

Castle On The Hill || Scrapbook Layout

Happy Saturday!
I have a mixed media layout to share today and it's inspired by 'Castle On The Hill' by Ed Sheeran. If you haven't heard it then a) where have you been for the past 2 months and b) go listen, now! 

When we went to Edinburgh, that song had just come out and it was going through my head when, walking to go out for a drink that evening, the sun was setting over the castle (on the hill). I took a few pictures but there were trees in the way but we got to the art galleries and there was a podium that I climbed on to take this picture (I had to be lifted down).

I still wasn't sure about the picture but I had a play around on my phone on 'Camera 360 Sight' and it has lots of effects to emphasise different weather conditions. This one really brought out the blue and the fire of the sunset. 

For this layout I really wanted to use some orange to bring out the colours of the sky. However, I am repulsed by the colour orange for a silly reason that I don't want to mention...
Anyway, I chose some paper for the background, this is a rather old 'on my desk' paper by Gossamer Blue )which I haven't heard of in ages.) I covered some parts of the paper with gesso and then did the packaging technique with spray ink over the gessoed areas.

The tags/layered papers are from the 'Happy Watercolour' 6x6" paper pad from The Works. It's a real bargain at £1 and the papers are so pretty.

The wood veneer are some form of American Crafts but I can't remember what collection. A lot of my stash is a bit older but that doesn't make it any less wonderful to work with.

The large thickers are from the Paige Evans Fancy Free collections by Pink Paislee and this is the first time I've used them and I love them. They're larger than normal and really grab your attention.

I finished off the layout with some machine stitching and some scrunched up thread.

Thanks for stopping by!
Emily xx

Thursday, 23 March 2017

Mother's Day Cards || Dovecraft Blooming Lovely

Hello crafty friends,

I am back with my final chunk of Mother's Day inspiration, this time using the Dovecraft Blooming Lovely collection from Trimcraft.

This one uses one of the new First Edition 'craft a card' dies. They are so versatile and easy to make a stunning card with.

This card uses the side fold 'card shape of the month' and you can find the tutorial here. (link)


To see my other Mother's Day inspiration, check out my Trimcraft gallery (link)

Emily xx

Tuesday, 21 March 2017

Fly || Scrapbook Layout || Simply Creative 'Chalkboard'

Hi all,

I have a layout to share today using the Simply Creative 'Chalkboard' papers from Trimcraft, along with a little mixed media in the form of yellow watercolour paint.

The photograph is of some waxwings that spent a few days in the area at the beginning of February. It's a bit of an 'out-take' shot but I really like it, how the camera captured details like the birds' feet and yellow tails, but blurred some of the wings.


Thanks for stopping by!
Emily xx

C

Saturday, 18 March 2017

Mother's Day Cards || Dovecraft Kiss & Make Up

Happy Saturday!

I am back with more Mother's Day inspiration and today's inspiration is a card using the Dovecraft Kiss & Make Up collection from Trimcraft.

This one is for my boyfriend to give to his mum....she's just about the coolest person I know and this collection is just perfect for a card for her.


I'll be back with some final Mother's Day inspiration on Thursday but if you can't wait that long then take a peek at my other Mother's Day cards on my Trimcraft gallery (link).

Emily xx

Thursday, 16 March 2017

Mother's Day Cards || Dovecraft Painted Blooms

Hi all,

With Mother's Day around the corner I have three blog posts full of inspiration to make a gorgeous card show your mum how much you appreciate her. I had five cards to make so I've been pretty busy!

These cards use the Dovecraft Painted Blooms collection from Trimcraft.

This one is my favourite and I'm giving it to my mum so shhhhh don't tell her
(Mum, if you're reading this, look away now.... Haha.... love you momma!)

It's so pretty yet it was so easy to make, stamping the flowers and colouring with watercolour pencils and then fussy-cutting them.


This one uses the Painted Blooms embossing folder. I find A6 embossing folders a little restrictive but with this one I covered the un-embossed area with shiny patterned paper.


To find out more about how I made these, head to my Trimcraft gallery (link)

Thanks for stopping by and stay tuned for more Mother's Day inspiration on Saturday!
Emily xx


Tuesday, 14 March 2017

Dream Big || Scrapbook Layout || Simply Creative 'Sweet Dreams'

Hi all,

I have a layout to share today using the Simply Creative 'Sweet Dreams' paper pad by Trimcraft.

The butterflies are fussy cut from a sheet in the 12x12" paper pad. Then I drew a circle lightly on the page and stuck the butterflies around it. Super easy to do and so pretty!


For a step by step guide to how I made this, check out my Trimcraft gallery (link).

Thanks for stopping by!
Emily xx

Saturday, 11 March 2017

Introducing Inspired By Paper Magazine!

Happy Saturday!

I have an extra special treat for you today.

I am proud to announce that my new magazine, Inspired By Paper, is now out and available to read, and what's more, it's free! Yes, you did read that correctly. Free!


I created the magazine for my final project of my Digital Media Production course at university and I adored creating it, talking to my contributors, putting the magazine together, sourcing the best new products to feature.
As this is a university project, I would love some feedback (don't just tell me it's good, tell me what you like about it and what you don't). It'd be good to have some quotes to put into my report. I don't submit until the end of April so any feedback will be used to improve the magazine so it is the best it can be for submission!

Here is the link, so grab a cuppa, put your feet up, have a read and be Inspired By Paper!

https://indd.adobe.com/view/2ff83ecb-192c-49ac-9dbd-1ebebdb7f86f

Thanks for stopping by and thank you in advance for the feedback!

Emily xx

Thursday, 9 March 2017

How To Deco Mache A Desk Tidy!

Hi all,

In today's blog I'm going to show you how to turn a plain kraft desk tidy into a pretty sparkly place to store your pens and pencils.

Here's a link to the desk tidy I bought from Hobbycraft http://www.hobbycraft.co.uk/kraft-mache-desk-tidy/568032-1000


Here's how to make it:


  1.  Remove the pots from the tray.  They may be stuck down but don’t worry if you tear the paper, it will be covered up anyway.
  2. Cover the base tray with deco papers. Start across the middle and do each end afterwards.
  3. Paint the inside of each pen pot with acrylic paint.
  4. Once dry, cover the pots with different deco papers.
  5. When the glue is dry, trim the excess paper from the pots.
  6. Add washi tape around the top of each pot. An opaque, thick tape is better for this as it stands up by itself and won’t bend around the rim of the pot, achieving a much neater finish.
  7.   Stick the pots into the tray and fill with your favourite crafty tools! 


Thanks for stopping by!
Emily xx


Tuesday, 7 March 2017

Liverpool || A4 Scrapbook Layout || Simply Creative 'Around The World'


Hi all

I have a layout to share today using the Simply Creative 'Around The World' papers by Trimcraft.

I printed my photo off at A5 width and trimmed the edges so it was slightly smaller than the page. 

On the background I die cut a pattern (using a First Edition background die) and then used it as a stencil, spraying ink through it and then removing the die cut to reveal the pattern underneath.

To find out more how I made this, head over to my Trimcraft gallery...! (link)

Saturday, 4 March 2017

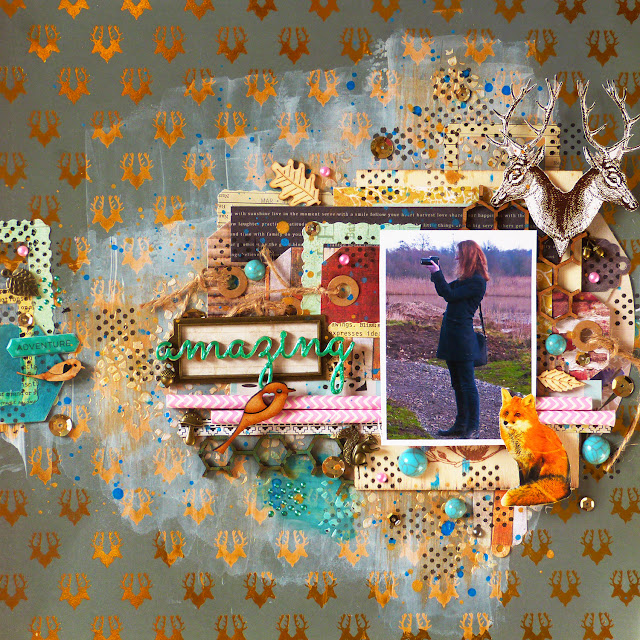
Amazing || Scrapbook Layout

Happy Saturday!

I have a mixed media scrapbook layout to share today and it's something that took a whole afternoon to make but I love it.

The photograph is of Nathan on a trip to the local nature reserve. For some reason we've never been before even though it's right on our doorstep. Nathan had got a new camera and we had fun testing it out. We sax foxes and deer as well as rare birds - a good day!


The background paper is foiled and is from the 'Gypsy Gypsy' paper pad by Craft Consortium. In the cover of the pad there are lots of gorgeous designs to cut out and I chose the stags' heads and the fox for this layout.

For the mixed media background I added some light gesso and then modelling paste through a Prima stencil. Once it has dried I rubbed some Nuvo embellishment mousse in gold over the top of the raised areas.

The 'amazing' is a wood shape from The Works and I covered it with Dovecraft 3D Pearl Effects paint. I added the paint over some of the polka dot stamped areas too.

Thanks for stopping by!
Emily xx

Thursday, 2 March 2017

Sweet Dreams Are Made Of Paper


Hey all,

I have a couple cards to share today using the new First Edition 'Craft A Card' dies by Trimcraft.
They come in 6x6" and 5x7" and there's so many different ways of using them.

The die I used for this has small holes around the edge of the circle in the centre, so I went around it with two colours of embroidery thread. The mandala is from the Simply Creative 'Kraft Keepsake' 12x12" paper pad.


This one uses Simply Creative 'Sweet Dreams' paper.


Thanks for stopping by!
Emily xx

Wednesday, 1 March 2017

Bloom & Grow || Scrapbook Layout || Life In A Snapshot Challenge || March 2017

Hi all

On the Life In A Snapshot team we've had a little break over winter but now we are back with our first challenge for 2017. However, sadly this will be our last challenge. Thank you if you have played along with it. To see everyone else's makes head to Katie's blog http://whatkatiedid2.blogspot.co.uk/
 Here is my layout:


The challenge was to follow a color scheme and we chose this one by Seeds.


I chose to make a spring themed layout using the 'Take Me Away' collection by Pink Paislee/Paige Evans. I ended up weaving strips of the striped paper from the 12x12" paper pad (it took a long time to get it right!).
The puffy stickers are We R Memory Keepers 'Flower Girl' and the bird and quote are Pinkfresh Studio 'Felicity'.

Thanks for stopping by!
Emily xx