Happy Saturday!
I have an extra special treat for you today.
I am proud to announce that my new magazine, Inspired By Paper, is now out and available to read, and what's more, it's free! Yes, you did read that correctly. Free!
I created the magazine for my final project of my Digital Media Production course at university and I adored creating it, talking to my contributors, putting the magazine together, sourcing the best new products to feature.
As this is a university project, I would love some feedback (don't just tell me it's good, tell me what you like about it and what you don't). It'd be good to have some quotes to put into my report. I don't submit until the end of April so any feedback will be used to improve the magazine so it is the best it can be for submission!
Here is the link, so grab a cuppa, put your feet up, have a read and be Inspired By Paper!
https://indd.adobe.com/view/2ff83ecb-192c-49ac-9dbd-1ebebdb7f86f
Thanks for stopping by and thank you in advance for the feedback!
Emily xx
Showing posts with label decoupage. Show all posts
Saturday, 11 March 2017
Thursday, 29 December 2016
More Couture du Jour cards!
Hi all,
It's been a very busy Christmas and I haven't had much time to craft. We spent Christmas in Liverpool and it was fabulous. A busy week, then it's New Year, but hopefully next week things will calm down a bit and I can get back into crafting properly!
I have some more cards to share using the Couture du Jour collection from Trimcraft.
It's been a very busy Christmas and I haven't had much time to craft. We spent Christmas in Liverpool and it was fabulous. A busy week, then it's New Year, but hopefully next week things will calm down a bit and I can get back into crafting properly!
I have some more cards to share using the Couture du Jour collection from Trimcraft.
For step by step instructions, head over to my Trimcraft gallery! (link)
Thanks for stopping by!
Emily xx
Saturday, 24 December 2016
Merry Christmas
Hi everyone,
A final Christmas card to share and this one is for all my lovely followers...!
As you read this I'll probably be on the way to Liverpool. Nathan walked in one day and told me that his parents are going to Liverpool for Christmas and that we are welcome to tag along. I had a think, and then I asked his mum about it one morning and she made it sound really exciting, so it was very hard to say no to. I know Nathan would prefer that too, and we did spend Christmas with my family last year. Very excited!
I've planned this as my last post before Christmas, so wherever you are and however you are spending Christmas, have a fabulous time!
Emily xx
Thursday, 8 December 2016
Couture du Jour cards!
Hi all,
I have some cards to share today using the Couture du Jour collection from Trimcraft.
For step by step instructions, head over to my Trimcraft gallery! (Link)
Thanks for stopping by!
Emily xx
I have some cards to share today using the Couture du Jour collection from Trimcraft.
Thanks for stopping by!
Emily xx
Tuesday, 8 November 2016
More Christmas Cards!
Hi all,
Hope the xmas cards aren't getting too much... limiting mine to one blog post a week.
The ones I'm sharing today are made with leftover stash from last year. Mostly docrafts collections and I made a couple cards to try out different techniques - (relatively) CAS and a mixed media one.
Thanks for stopping by!
Emily xx
Labels:
card,
cardmaking,
christmas,
crafts,
decoupage,
docrafts,
mixed media,
papercraft
Thursday, 20 October 2016
Have a Gypsy Gypsy Christmas!
Hi all,
A Christmas card to share today using the Gypsy Gypsy paper pad by Craft Consortium, plus some of their Christmas decoupage paper.
The stag's head is painted white and covered with glitter. It's an MDF shape from one of last year's xmas collections from docrafts.
Thanks for stopping by!
Emily xx
Tuesday, 11 October 2016
Craft Consortium Kori Kumi 3D Hexagon Box
Hi all,
A new project to share using the Santoro Kori Kumi collection from Craft Consortium.
I love decorating boxes so I was super excited when I saw the decoupage papers in this collection. I used them to decorate a box from The Works.
I have learnt recently that it is no hardship to get out a screwdriver and remove the fixings from the box first and then put them back once the box is completely dry.
As you can see, I made the top of the box into a little 3D scene using the wood veneer and some cut up lolly sticks as a little fence. I stuck everything on with hot glue and then added raffia along the top of the fence and pom poms around the bottom of the wooden elements and stuck in some of the heart pins for good measure. The sides of the box looked a bit plain in comparison so to finish I die cut some flowers.
Now, while I've GRABBED your ATTENTION.....!
Please fill out this short survey about papercraft magazines for my uni project. Yep, I'm making a papercraft magazine, because let's face it, there's not that much on the market that's exciting and innovative! https://www.surveymonkey.co.uk/r/3PSXYFR
Thanks for stopping by! And an extra 'thank you so much!' for filling out the survey.
Emily xx
Labels:
3d,
box,
craft consortium,
crafts,
decopatch,
decorated,
decoupage,
DIY,
kori kumi,
papercraft,
santoro,
the works
Tuesday, 4 October 2016
Craft Consortium Kori Kumi Frame Box
Hi all,
A box to share today using the Santoro Kori Kumi collection from Craft Consortium.
As you may know I love decorating boxes and I was in The Works and I saw this one and I thought the frame would look cool with some 3D decoupage inside.
It didn't take me long at all to decorate the box with the decoupage papers.. they cover really nicely and I love how they're opaque.
I added in the decoupage and then finished off with some die cut flowers.
Thanks for stopping by!
Emily xx
Tuesday, 9 August 2016
Tutorial Tuesday - Shabby Chic Heart Frame by The Works
Hi all,
I was kindly sent some products to blog about from The Works.
I have a new video to share today showing how I decorated this frame - I feel like decoupage can be intimidating when faced with a bare object and a pack of paper so here I show you how easy it is to make a beautiful home decor piece like this.
I was kindly sent some products to blog about from The Works.
I have a new video to share today showing how I decorated this frame - I feel like decoupage can be intimidating when faced with a bare object and a pack of paper so here I show you how easy it is to make a beautiful home decor piece like this.
Stay tuned as I have a few more makes to share soon featuring more products from The Works.
Thanks for stopping by!
Emily xxx
Labels:
crafts,
decopatch,
decoupage,
heart,
home decor,
papercraft,
shabby chic,
the works,
vintage
Thursday, 23 June 2016
Belle & Boo Bunting Card
Hi all,
A new card to share today using the Belle & Boo collection by Trimcraft.
It's an A5 card, I would have made it smaller but I wanted to include the decoupage but not as the main focus of the card. I bought a set of Xcut mini bunting dies and never used them yet so I thought they would be perfect on a card where Belle is having a picnic.
To start with, the paper wasn't quite as wide as the card blank so I cut it down so it would be the same distance from the top and bottom as either side. I then cut two strips of paper 2 inches wide and stuck one at the bottom of the paper and one a little further up, this one with a punched scalloped border. I stuck these together and then cut an aperture from the centre. I die cut some bunting from the paper pack and stuck the largest bunting directly onto the card blank and used a glue gun to stick twine on top. I then added the layered papers with 3D foam dots. The decoupage is stuck on top of this, then more twine and the smaller bunting pieces, with 3D dots under these too.
I think this is my favourite card I've made so far... !
Thanks for stopping by!
Emily xx
A new card to share today using the Belle & Boo collection by Trimcraft.
It's an A5 card, I would have made it smaller but I wanted to include the decoupage but not as the main focus of the card. I bought a set of Xcut mini bunting dies and never used them yet so I thought they would be perfect on a card where Belle is having a picnic.
To start with, the paper wasn't quite as wide as the card blank so I cut it down so it would be the same distance from the top and bottom as either side. I then cut two strips of paper 2 inches wide and stuck one at the bottom of the paper and one a little further up, this one with a punched scalloped border. I stuck these together and then cut an aperture from the centre. I die cut some bunting from the paper pack and stuck the largest bunting directly onto the card blank and used a glue gun to stick twine on top. I then added the layered papers with 3D foam dots. The decoupage is stuck on top of this, then more twine and the smaller bunting pieces, with 3D dots under these too.
I think this is my favourite card I've made so far... !
Thanks for stopping by!
Emily xx
Labels:
belle and boo,
bunting,
card,
cardmaking,
crafts,
decoupage,
die cut,
papercraft,
picnic,
Trimcraft,
xcut
Saturday, 11 June 2016
Father's Day Cards
Hi all,
With just over a week to go until Father's Day, there's still time to make a card and here are some I have made if you need any inspiration!
Thanks for stopping by!
Emily
With just over a week to go until Father's Day, there's still time to make a card and here are some I have made if you need any inspiration!
Thanks for stopping by!
Emily
Labels:
card,
card making,
cardmaking,
cards,
crafts,
dad,
decoupage,
father,
Father's Day,
papercraft
Saturday, 5 March 2016
Owl Decoupage Birthday Card & Gift Tag
Hi all
I'm back to share a card I made for the Docrafts Trade Catalogue and the March issue of Creativity Magazine. It's using Anita's foiled decoupage, and Country Life papers.
Amid all the disappointment I've had with DC lately, it's nice to see my name and work in their magazine.
I'm back to share a card I made for the Docrafts Trade Catalogue and the March issue of Creativity Magazine. It's using Anita's foiled decoupage, and Country Life papers.
Amid all the disappointment I've had with DC lately, it's nice to see my name and work in their magazine.
I'm normally not a fan of the foiled decoupage sets but these woodland ones are really cute!
Thanks for stopping by!
Emily xx
Labels:
birthday,
card,
cardmaking,
crafts,
creativity,
decoupage,
docrafts,
gift tag,
magazine,
papercraft
Friday, 6 November 2015
Docrafts November Collections Unboxing
Hi all
As you may know, I am on the Project Design Team for Docrafts. Every couple of months, new products come out and we get sent a selection to make some projects for their website with. This time there are new Xcut dies, Creativity Essentials stamps, Bare Basics embellishments and boxes, and Papier Patch decoupage papers.
Labels:
bare basics,
crafts,
decoupage,
docrafts,
papercrafts,
unboxing,
xcut,
youtube
Wednesday, 2 September 2015
Folk Floral Planner
Hi all
Here to share something I've been wanting to make for a while - a flip planner.
When the Papermania Folk Floral collection arrived for me to play with,, courtesy of docrafts, I knew that this project was perfect to use with the collection's decoupage papers and die cut embellishments.


To make it, I cut out 6 A5 rectangles from cardboard, covered them in decoupage paper, added a calendar, and finally co-ordinating embellishments.
To find out more head over to the docrafts website where there's a step by step (X)
Until next time...!
Here to share something I've been wanting to make for a while - a flip planner.
When the Papermania Folk Floral collection arrived for me to play with,, courtesy of docrafts, I knew that this project was perfect to use with the collection's decoupage papers and die cut embellishments.
To make it, I cut out 6 A5 rectangles from cardboard, covered them in decoupage paper, added a calendar, and finally co-ordinating embellishments.
To find out more head over to the docrafts website where there's a step by step (X)
Until next time...!
Friday, 31 July 2015
Docrafts Design Team Blog Hop July 2015
Hi all

The theme for this blog hop is makes with interactive elements. I've made a shaker card using Gorjuss decoupage.
I made two circles of clear plastic packaging the same size as the frame on the decoupage, filled it with tiny stars, stuck onto the background of the decoupage. I made up the rest of the decoupage and stuck it on top. (FYI, the tiny stars are from Fred Aldous in Manchester)

Don't forget to check out the blogs of my fellow members!
Mags Woodcock https://thetaglady.wordpress.com
Julie Wilson http://newnanny.blogspot.co.uk/
Michelle- http://scrapthology.blogspot.co.uk/
Sarah Douglas http://stickerkitten.co.uk/
Amy Surey https://amysureycreations.wordpress.com/
Thanks for hopping by!
Wednesday, 29 July 2015
Decoupage Christmas Cards
Hi all,
I was sent some of the new Christmas foiled decoupage by docrafts. Here's some cards I have made - I hope I've inspired you to use decoupage on your cards too!
The decoupage sheets are all foiled, and numbered so they are easy to put together. There are traditional designs, religious, and more modern designs such as birds.
I was sent some of the new Christmas foiled decoupage by docrafts. Here's some cards I have made - I hope I've inspired you to use decoupage on your cards too!
The decoupage sheets are all foiled, and numbered so they are easy to put together. There are traditional designs, religious, and more modern designs such as birds.
These first two cards have a background made using the Xcut Fairisle A4 embossing folder. It works so well on textured cardstock.
For this next card I made pennants using last year's Letter To Santa collection papers by Papermania. I mounted them on silver mirror board - one of my favourite Christmas products!
This last card feels a little more old fashioned with the horse drawn carriage on the decoupage. I tried to echo this with traditional tartan print paper, lace trim and brown string.
Labels:
card,
card making,
christmas,
crafts,
decoupage,
docrafts,
embossing,
foiled,
papercraft,
papermania,
xcut
Wednesday, 15 July 2015
A Sneak Peak at the new Santoro's Gorjuss collection!
Hi all
I am lucky enough to have been sent some of the new Santoro's Gorjuss products by Docrafts.
I've had a play around, scroll down to see what I made!
I am lucky enough to have been sent some of the new Santoro's Gorjuss products by Docrafts.
I've had a play around, scroll down to see what I made!
The range has a lovely cosy wintery feel, with tweed and tartan patterns.
Here's what I made.
I wanted to make use of the decoupage papers I'd been sent - I've always wanted to have a go at upcycling - so I covered a plain 8x8" scrapbook:
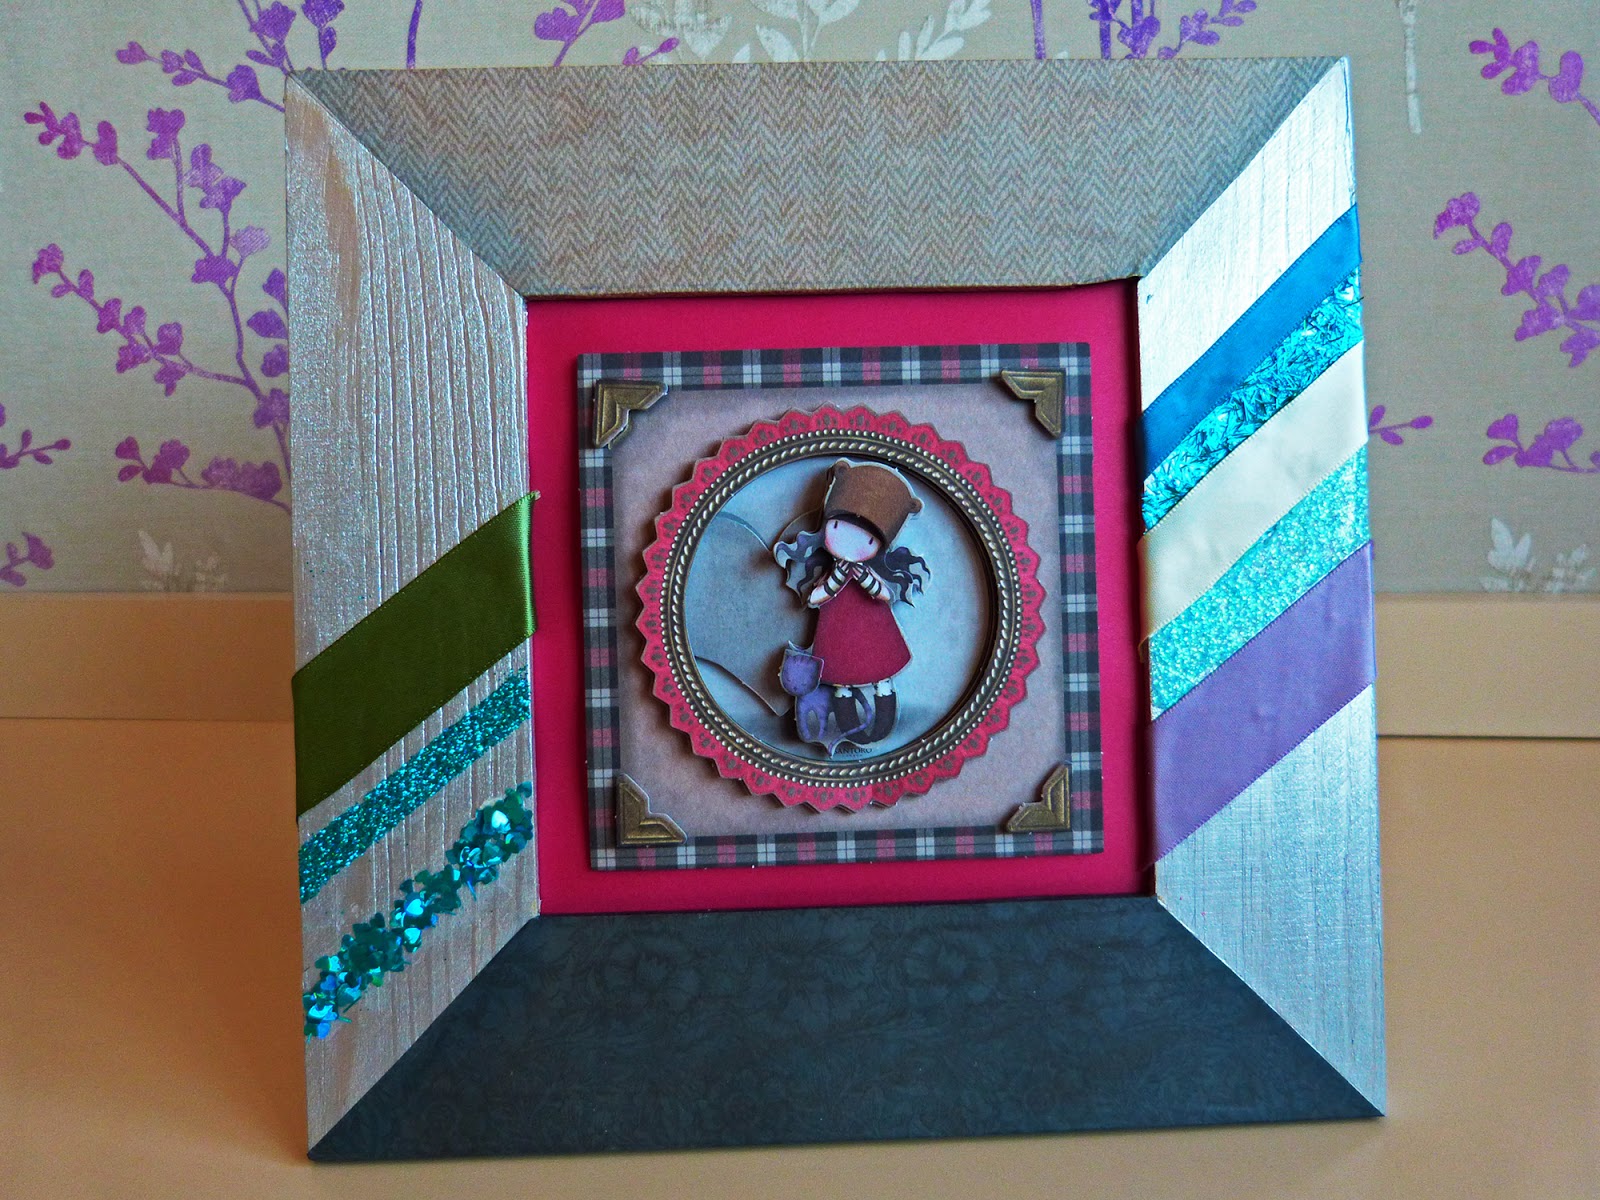
And in Manchester I picked up a little wooden frame and some glitter. I painted the frame with several coats of silver metallic acrylic paint, added decoupage paper, then finished it off with stripes of glitter and ribbon. I replace the glass with Gorjuss decoupage - a frame doesn't just have to be used for photographs!
And finally, a scrapbook page. I've dithered over this for days. What pictures to use. I am severely lacking in winter photos - most family ones involve people either asleep or washing up...
But I can always rely on the beautiful city of Chester to provide me with winter scrapbook layout salvation.
On this layout I've also use Bare Basics and Denim Blue products - they really complement the Gorjuss range.
Thanks for stopping by!
Labels:
8x8,
chester,
christmas,
crafts,
decopatch,
decoupage,
docrafts,
frame,
gorjuss,
layout,
papercraft,
papermania,
santoro,
scrapbook,
scrapbooking,
upcycling
Subscribe to:
Posts (Atom)