.

.

.

.

Tuesday, 30 May 2017

York || Scrapbook Layout || First Edition 'Wild Flower' || Step By Step

Hi all,

I have a pretty, watercolour-y scrapbook layout to share today using the First Edition 'Wild Flower' paper pad by Trimcraft. 

The picture is of the ruins in the Museum Gardens in York. 


Step by step:


  1. Spread gesso across the centre of the page and allow to dry.
  2. Scribble purple gelato or paint purple watercolour onto plastic packaging, add water and then smoosh onto the gesso.
  3. Cut two strips from 12x12" paper, one 1" wide and the other 3" wide. Stick to the page, leaving a small gap in between.
  4. Add a length of ribbon and a length of washi tape in the gap between the patterned paper. 
  5. Print your photo at 3x4" and mount a couple of times with patterned paper. Stick down in the centre of the page.
  6. Die cut several pennants from patterned paper and textured cardstock, layer and stick to the top left and bottom right of the page using a stapler. 
  7. Add floral stickers and a title.
  8. Finish with ink spatters, adhesive gems, buttons and flowers.
Thanks for stopping by!
Emily xx

Saturday, 27 May 2017

Summer || Scrapbook Layout || OneCanoeTwo 'Hazelwood'

Hi all,

Summer is here and I have a layout to share using a very summery picture I took on a recent visit to Potteric Carr, our local nature reserve. It's a beautiful place with a huge variety of habitats and wildlife and a great place to go to get away from everything.

I mostly used the OneCanoeTwo 'Hazelwood' collection (my favourite collection ever!) for this page. 


The layout was created as part of the National Scrapbook Day challenges over on the For The Love Of Pretty Paper Facebook group, this one was to make a spring or summer themed layout.

Thanks for stopping by!
Emily xx


Thursday, 25 May 2017

Blue Tit || Scrapbook Layout || StudioLight 'My Botanic Garden' || Scraplift Yourself

Hi all,

I have a scrapbook layout to share today using the StudioLight 'My Botanic Garden' collection that you can pick up from Cherish The Memory

I must admit, I cheated a bit with this - the picture is printed from Wikipedia - I tried for ages to get a decent picture of the Blue Tits in our garden but they are too far away and too fast. But, I had this idea of using a picture of the little birds with the collection so to Google I went.


This layout was created for one of the National Scrapbook Day challenges over on 'For The Love Of Pretty Paper' on Facebook. The challenge was to 'scraplift' one of your oldest or even your first scrapbook layout. Here is a pic of the new layout with the one it was scraplifted from. I made it back in 2006. In my defence, there wasn't anywhere near as many scrapbook products available and also, I was 12 years old! I really enjoyed scraplifting myself.

Thank for stopping by and I wonder if you will try scraplifting yourself too!
Emily xx

Tuesday, 23 May 2017

On Fleek || Scrapbook Layout || Dovecraft 'Kiss & Make Up'

Hi all,

I have a scrapbook layout to share today using the Dovecraft 'Kiss & Make Up' collection by Trimcraft.

I know it may seem narcissistic to use selfies on scrapbook layouts but this collection really lends itself to scrapping selfies.

This layout got a bit messy, I made the mistake of spattering drawing ink onto the page and it went everywhere and looks a bit messy. I'm not that happy with it but sometimes you just have to go with the flow.

I made this layout as part of the National Scrapbook Day challenges over on the 'For The Love Of Pretty Paper' group on Facebook, the challenge was to make a layout based on this sketch, designed by Laura Rumble for UK Scrap Addicts:

The challenge has ended now but there is no reason why you can't use this sketch for inspiration anyway. 

Thanks for stopping by!
Emily xx


Saturday, 20 May 2017

Birb Watching || Scrapbook Layout

Hi all,

Here's the first of a series of blog posts that come under the umbrella of 'Emily Loves Scrapbooking Again!!'. There'll be a new layout comprised of non-design team products every Saturday for the considerable future. 

"You stopped loving scrapbooking?!" 
Well, not exactly. But I overthought every single layout I made. 
I'd love to be on a scrapbook design team so I could concentrate on scrapbooking but this is the hand I am dealt right now and I am very grateful for my current opportunities. 
Another problem for me was and is, dolla. I've finished uni and haven't worked out what I want to do with my life yet. So I'm saving what I can and that means I can't justify a scrapbook kit subscription. 

But then National Scrapbooking Day happened.....
I am a member of the 'For The Love Of Pretty Paper' UK scrapbooking group on Facebook. Over that weekend they posted 12 challenges and during the weekend and following week I completed every single one and loved it! I really enjoyed getting stuck in with my stash and not having to stick to any particular brand. I even got completely caught up with my 2017 scrapbook. 

Here is a layout I made for a 'tic-tac-toe' challenge, to pick three items from a table of nine. My choices were fussy cutting, die cut and ink spatters. 

The picture I used is of my boyfriend on a recent visit to the local nature reserve. We had heard a 'birb' (what he likes to call a small bird, it's very sweet), but couldn't see it. Here he is looking for it, camera at the ready.


To make the layout I chose to use my Heidi Swapp 'September Skies' paper pad. I picked it up a couple years ago in TKMaxx before they made the ridiculous decision to stop selling scrapbook supplies.
I fussy cut the floral paper and layered behind the photo, adding die cut birds on top and finally my title, journalling and ink spatters.

Thanks for stopping by!
Emily xx

Thursday, 18 May 2017

How To Make 3 Cool Cards Using The Dovecraft Monochrome Goody Bag!

Helllooooo!

I have three projects to share today using one of the new 'Goody Bags' from Trimcraft. There are several to choose from and today my projects are from the Monochrome Goody Bag. There are instructions below each image.

Each pack has a selection of 6x6" and 8x8" patterned papers, 6 sturdy coloured 6x6" card blanks with envelopes, sentiments, buttons, flowers and gems, as well as a project sheet to get you started. They're perfect if you're no good at choosing co-ordinating supplies, if you need stash in a particular colour (like I needed some purple things last year so I bought a purple 'goody bag' - this was before I was a Trimmie!). They'd also make a great gift for someone who is just getting into cardmaking or scrapbooking. There are so many possibilities with these goody bags as I am about to show you.


1.       Cut a 14cm square from patterned paper and mount onto black cardstock and cut out, leaving a small border
2.       Position a star die in the centre and die cut.
3.       Cut two pieces of acetate just larger than the aperture, stick the edges together, leaving a gap.
4.       Fill the gap with sequins and then seal.
5.       Stick the pocket behind the aperture and then stick the whole thing to a 6x6” card blank.
6.       Die cut smaller stars from vellum, and ‘happy birthday’ from black cardstock and attach to the card.
7.       Finish with a die cut pennant and spatters of black and gold ink.


 1.       Cut a 14.5cm square from patterned paper. Ink the edges with black ink and then stick to a 6x6” card blank.
2.       Cut a 14cm square from a different sheet. Ink the edges with black ink and then stick to the larger square.
3.       Cut four 6.5, four 6 and four 5.5cm squares from patterned paper. Ink the edges and then stick a small, medium and large square together.
4.       Arrange the four layered squares onto the card and stick down.
5.       Draw around the acetate backing of the large ‘with love’ stamp onto vellum and cut out.
6.       Stamp the ‘with love’ stamp onto the vellum and mount onto patterned paper. Cut out, leaving a small border.
7.       Layer up paper flowers, stick a brad through the centre and through the ‘with love’ piece.
8.       Stick the whole thing to the card. 

1.       Cut a 14.5cm square from patterned paper and stick to a 6x6” card blank.
2.       Cut a 6.5cm square from patterned paper and mount onto black cardstock and cut out, leaving a thin border.
3.       Cut a length of silver thread and loop and stick in the centre of the square.
4.       Die cut two flourishes from black cardstock
5.       Die cut a dragonfly in black and silver and stick the silver on top of the black. Stick on top of the looped thread along with the black flourishes.
6.       Cut two 1.5cm wide strips of patterned paper, invert an end of both, stick to the centre of the card and trim off the ends.
7.       Stick the decorated small square to the centre right of the card.

8.       Finish with a sentiment, buttons and splatters of black ink.

I hope you've been inspired by my cards - I had a fun day making them whilst watching the Formula One!
Thanks for visiting!

Emily xx

Tuesday, 16 May 2017

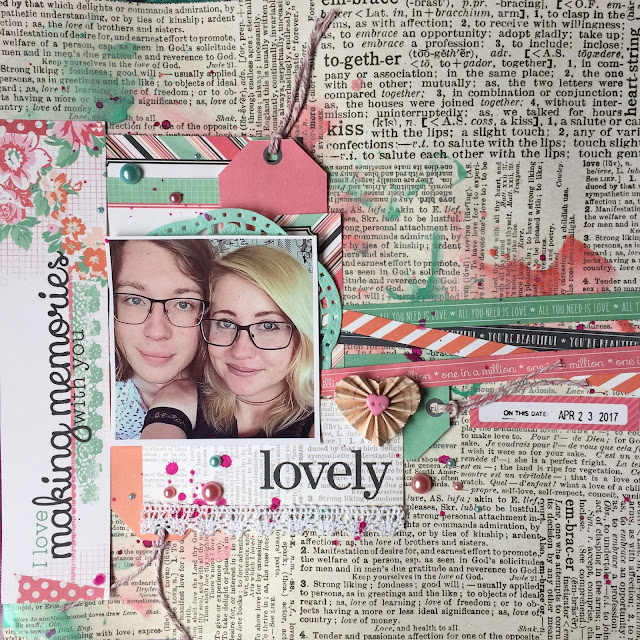
Lovely || Scrapbook Layout || First Edition 'Sweet Nothings'

Hi all,

Today I have a layout to share with you using the First Edition 'Sweet Nothings' paper pads by Trimcraft. It has a really gorgeous pink, peach and aqua colour scheme, with lots of florals. There's a cut apart sheet (well, 3) in each pad and that is what I used to make this layout. It is a shame that First Edition pads do not have matching embellishments but these cut apart sheets make up for it a lot and allow for a wider variety of creative inspiration. 

The picture I used is a selfie of Nathan and I before a date night. I believe this one was Wagamama (again!)


Step by step:


  1. Cut apart the cut apart sheet in the 'Sweet Nothings' 12x12" paper pad.
  2. Take a 12x12" sheet of bookprint paper and paint gesso across the centre and up and down the left side of the page. Leave to dry.
  3. Paint watercolour onto plastic packaging with plenty of water. Smoosh onto the gessoed areas.
  4. Arrange the long border pieces along the centre of the page at different angles. 
  5. Print a photograph at 4x4" and add other pieces of the cut apart sheet behind it, along with a coloured doily. 
  6. Punch holes in tags and add twine through the holes. 
  7. Stick the 'I love making memories with you' piece on the left side.
  8. Add a length of crochet trim beneath the title.
  9. Finish with adhesive pearls. 
Thanks for stopping by!
Emily xx

Saturday, 13 May 2017

You & Me || Scrapbook Layout || Pebbles/Jen Hadfield 'Simple Life'

Happy Saturday!

Good news - I have finally finished scrapping my Edinburgh photos! This is the last layout and we took the selfie while we were waiting for food to arrive in the Slug & Lettuce. I don't know why I'm looking over --->. Perhaps I wasn't ready. Who knows?


I mostly used the Pebbles/Jen Hadfield 'Simple Life' collection here - I have the 6x6" paper pad and the printed wood veneer - as you may know I'm always on the lookout for something a little bit different and these definitely fit the bill. The rose on the left is fussy cut from the paper pad.

The backing paper is from Maggie Holmes 'Shine' and I added gesso and used the packaging technique with some teal gelato.

The other elements in the layout are mostly OneCanoeTwo 'Hazelwood'.

Thanks for stopping by!
Emily xx


Thursday, 11 May 2017

How To Make Super Quick Cards || Simply Creative Around The World

Hi all!

I have another card making tutorial for you today, showing you how to make super quick and easy cards. These are great if you're a beginner or you haven't much time to craft.

These cards are made using the Simply Creative 'Around The World' papers and Dovecraft large sentiment stamps from Trimcraft. I love the little balloons! 


1.       Cut a 9x13.5 rectangle of white cardstock.
2.       Spray blue ink onto plastic packaging and smoosh onto the cardstock. Leave to dry.
3.       Stamp a large ‘happy birthday’ onto the piece of cardstock.
4.       Fussy cut hot air balloons and stick around the sentiment.
5.       Mount the whole thing onto patterned paper and then onto an A6 card blank.


1.       Stamp two balloons in black into onto white cardstock.
2.       Colour the balloons.
3.       Stamp a large ‘thank you’ onto white cardstock.
4.       Cut a square around the sentiment and mount onto patterned paper twice.
5.       Cut a 8x15.5cm rectangle from balloon patterned paper. Mount onto more patterned paper and stick left of centre onto a 6x6” white card blank.
6.       Add two strips of washi tape across the card.
7.       Stick the ‘thank you’ onto the card.
8.       Stick the balloons to the right of the card.

Thanks for stopping by!
Emily xx


Tuesday, 9 May 2017

#Snapchat || Scrapbook Layout || Dovecraft 'Kiss & Make Up'

Hi all,

I have a scrapbook layout to share today using the Dovecraft 'Kiss & Make Up' collection from Trimcraft. It's just so cool, right? I also used some machine stitching on this. It's optional but gives such a great effect (except when it comes unthreaded and the air turns blue.... ). There's a tutorial on how to make it below the picture. 


So, the pictures. My cousin Caroline and I were messing around on Snapchat at our grandparents' house at Easter. At the time I had a Windows phone so didn't even know what Snapchat really was.... I know, right?! On the day of writing I should be getting an iPhone.... not my birthday yet but my OH doesn't want me "crying" over a glitchy phone any longer... 


Instructions!

1.       Using an old credit card or a palette knife, spread a layer of gesso across the centre of a 12x12” sheet of textured, coloured cardstock and allow to dry.
2.       Spray red ink across the centre of the page. You can use a stencil if you want.
3.       Print your photos at 2x3”. Mount them onto tissue paper and then onto patterned paper.
4.       Stick both onto a piece of patterned paper and mount onto another. Stick this onto white tissue paper.
5.       On the left side of this, stick three patterned tags so they are peeking out from behind. Stick the whole thing in the centre of the layout.
6.       In the top left and bottom right, stick lengths of washi tape and ribbon.
7.       (Optional) Using a sewing machine and various colours of thread, stitch along the ribbon and washi tape with straight and zigzag stitches. Also stitch around the photos and a zigzag down the left side.
8.       Ball up your offcuts of thread and stick behind your photos.

9.       Finish with brads, tags and chipboard stickers.

Thanks for stopping by!
Emily xx 

Saturday, 6 May 2017

Love You || Scrapbook Layout || Pink Paislee 'Moonstruck'

Happy Saturday!

I have a layout to share today using my favourite sheet of paper EVER. Yes, you heard me right. I have a favourite sheet of paper. It is from the 'Moonstruck' collection by Pink Paislee, I got it in a 'Like For Ever' Kit last year (I don't know if that still exists?) and I had been hoarding it.

Hoard it no more, I said! I chose to use it to scrap this picture of my boyfriend in the pub on our trip to Edinburgh.


I didn't want to cover the paper up too much though as it is so gorgeous so I opted to paint a small area behind where my picture and embellishments would sit, with gold acrylic paint. I covered various pieces of wood veneer with the same paint and arranged them in a diagonal across the layout. I then added some Pusheen stickers (why not, eh!?), more Moonstruck bits and pieces and gold word stickers. The title is from a rub-on sheet by Jen Hadfield. I finished it off with some spatters of gold ink - I can't find the docrafts gold spray ink any more and it's a real craft staple for me, but thankfully my friend had some spare so sent me it - forever thankful!

Thanks for stopping by!
Emily xx

Thursday, 4 May 2017

How To Make A Super Sweet Card || Simply Creative 'Make A Wish'

Hi all,

Today I'm going to show you how to make this super sweet card using the Simply Creative 'Make A Wish' papers and First Edition dies from Trimcraft.

 Donut worry, it's super easy! 


1.       Using a compass, draw a circle on white cardstock just smaller than 6 inches in diameter. Cut out and die cut a circle from the centre. If you have a large circle die set you won’t need the compass.
2.       Using 3D Pearl Effects, go around the edges of the donut as well as across the entire donut to look like icing.
3.       Die cut another, smaller donut from patterned paper and stick on top of the larger one.
4.       Die cut sweets from textured cardstock. If any have open areas then back them with patterned paper.
5.       Arrange the sweets around the donut and stick down.
6.       Add 3D Pearl Effects in white to the sweets to make them look shiny.
7.       Stick the donut to a square of patterned paper and then stick to a 6x6” card blank.

8.       Finish with a sentiment in the centre.

Thanks for stopping by!
Emily xx

Tuesday, 2 May 2017

Betsy Ann Poole || Scrapbook Layout || My Botanic Garden || Cherish The Memory DT

Hello!

Today I have a layout to share using a photograph of my great-great-grandmother, Betsy-Ann Poole. I was shown the picture when I was at my grandparents' house a couple weeks ago. I took a picture of the picture on my phone - I love to scrap old photographs, and family history really interests me. Not sure why, I think I am just curious.


I recently got on the 'Cherish The Memory' design team, and the 'My Botanic Garden' collection by StudioLight was in my kit and it was perfect for a layout using an old photograph.

This layout may look complicated but it really isn't if you break it up into little steps:

  1. Cover the area behind where you know your picture and ephemera will sit, with gesso.
  2. Use the packaging technique to smoosh co-ordinating watercolours onto the background.
  3. Stamp around the area with a pattern stamp.
  4. Print your photo and mount.
  5. Cut a selection of patterned papers and arrange behind the photo, along with tags and other ephemera. Most of what I used here is from a 12x12" sheet that I cut apart. 
  6. Add more pattern stamping and embellish. 


 I don't think I'd do vintage all the time but it is a nice change when I do do it. I love all the layers and ephemera in this collection - there are die cut and decoupage sheets available as well as the 12x12" papers. You can buy the collections from Cherish The Memory HERE.

Thanks for stopping by!
Emily xx